Introduction to Building Dashboards in Excel
Excel dashboards are powerful tools that enable you to visualize vast amounts of spreadsheet data effectively. When you build a dashboard in Excel, you convert raw data into charts, reports, and interactive visuals. This process not only improves your ability to understand the data but also helps you make informed business decisions.
Whether you want to analyze sales figures, track financial performance, or monitor key performance indicators (KPIs), a well-designed Excel dashboard can provide you with clear insights at a glance.
Why Create Dashboards in Excel?
- Data Visualization: Transform raw data into clear, visually appealing charts and graphs.
- Interactive Reporting: Use slicers and filters to allow easy data exploration.
- Business Insights: Track KPIs and trends to support decision-making.
- Customizable: Tailor dashboards to meet specific business needs and preferences.
While Excel may seem complex at first, building dashboards becomes easier with practice. This guide will take you step-by-step through creating a simple yet interactive dashboard that anyone can build.
Step-by-Step Guide to Building a Dashboard in Excel
Follow these practical steps to create your first Excel dashboard:
Step 1: Import or Enter Data
Gather all relevant data by importing from external sources or entering information directly into an Excel spreadsheet.
Step 2: Create Pivot Tables
Select your data range, then go to Insert > PivotTable and place the pivot table on a new worksheet. Pivot tables summarize and organize your data efficiently.
Step 3: Insert Slicers for Filtering
Within the pivot table tools, add slicers by clicking Insert Slicer. Slicers provide interactive buttons to filter data based on fields like sales regions, product categories, or dates.
Step 4: Format Your Slicers
Customize slicer appearance by adjusting size, color, and style from the Slicer Tools tab, making your dashboard visually appealing and consistent.
Step 5: Manage Slicer Settings
Rename slicer headers and configure sorting and display settings for better usability. For example, deselect options like “Show items with no data” to keep the slicer clean.
Step 6: Design Your Dashboard Canvas
Create a new worksheet to act as your dashboard. Add titles, company logos, and arrange slicers intuitively for easy navigation and clarity.
Step 7: Link Pivot Table Values to Dashboard
Return to your pivot tables and set continuous variables (like sales amounts or expenses) in the Values area. Use cell references on your dashboard to link these values dynamically.
Step 8: Format Data References
Apply number formats, bold fonts, and colors to your data cells on the dashboard to emphasize key figures and improve readability.
Step 9: Create Separate Pivot Tables for Categories
Build individual pivot tables for each categorical field (e.g., product lines or regions) to avoid errors when filtering. Ensure “Show items with no data” is selected to maintain consistent references.
Step 10: Connect Slicers to Pivot Tables
Link each slicer to all relevant pivot tables by selecting the slicer, then choosing the connected pivot tables in the Slicer Tools > Report Connections menu.
Step 11: Build Charts Using Referenced Data
Rather than creating charts directly from pivot tables (which often include extra features and formatting), build charts based on the numeric cell references from your pivot tables. This approach gives you more control over chart appearance.
Step 12: Add Conditional Formatting and Data Bars
Enhance the dashboard by adding data bars, color scales, and icon sets through conditional formatting in the Home tab. These visuals help highlight trends and performance.
Tips for Creating Effective Excel Dashboards
- Keep It Simple: Focus on key metrics and avoid clutter.
- Use Consistent Colors: Align with your brand or use meaningful color codes.
- Make It Interactive: Use slicers and filters thoughtfully to enable exploration.
- Test Your Dashboard: Validate data accuracy and usability before sharing.
- Update Regularly: Refresh your data source to keep insights timely.
Niche Examples for Excel Dashboards
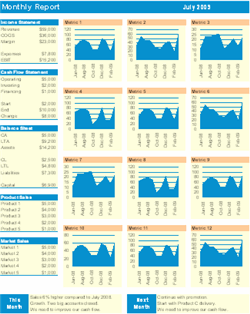
Sales Performance Dashboard
- Track monthly sales by region using pivot tables and maps.
- Use slicers to filter by product category or sales representatives.
- Visualize revenue trends with line charts and KPIs.
Financial Dashboard for Small Businesses
- Summarize income, expenses, and cash flow with pie charts.
- Highlight budget versus actual spending using data bars.
- Use drop-down slicers to switch between monthly and quarterly views.
Project Management Dashboard
- Display project status by phase using indicators.
- Track resource allocation with bar charts linked to pivot tables.
- Filter tasks by team member or priority with slicers.
Quick Reference Checklist for Building Excel Dashboards
| Step | Action | Example |
|---|---|---|
| 1 | Import or enter clean data | Sales records with date, region, product, amount |
| 2 | Create pivot tables summarizing data | Sales totals by month and region |
| 3 | Add slicers for interactivity | Filter by product category or sales rep |
| 4 | Format slicers for usability | Consistent colors and sizing |
| 5 | Design dashboard layout | Clear title, logo, and arranged visuals |
| 6 | Link pivot table data on dashboard | Use cell references for values |
| 7 | Create charts referencing data cells | Bar charts for monthly sales |
| 8 | Add conditional formatting | Data bars for expenses exceeding budget |
| 9 | Test dashboard functionality | Interact with slicers and validate numbers |
Conclusion
Creating dashboards in Excel is a valuable skill for visualizing data and gaining actionable insights. This step-by-step approach makes dashboard building approachable, even for beginners. With practice, you can develop more complex and tailored dashboards to fit your business needs.
Explore advanced Excel reporting and financial tools to expand your dashboard capabilities and automate your data workflows. You can benefit from readily available solutions that enhance productivity and analysis.

For detailed templates and further automation in Excel dashboards, you might find the Automated Excel Reporting package particularly useful. It offers pre-built dashboards and tools to save time and improve accuracy.